Hosting images can be done using different methods, however I found the method featured in this blog the easiest (and cheapest). It will allow you to make use of Backblaze free tier, and their excellent API. We will use Cloudflare as a DNS provider and to allow a subdomain to point to our images dynamically, so it looks nice as well.
This blog post will explain how.
Criteria
- Free
- Quick
- Easy
Note: I already made use of Cloudflare and their DNS services, so if you don't already make use of them and don't want to switch, this might not be for you.
Prerequisites
You will need accounts at both Cloudflare and Backblaze, so make sure you have those before you continue:
Additionally you will need a domain, because we will use this to set up a subdomain which will link to images hosted on backblaze. It will be good if you already have added your domain to the cloudflare account.
Let's get started
Once you have all things we can start. We will do the following:
- Create a bucket on Backblaze
- Point subdomain to this bucket in Cloudflare
- Create a transform rule
- Set up headers (to improve caching)
1. Creating a bucket on Backblaze
Did you already made use of Backblaze and do you already have a bucket set up then you can skip this step. It doesn't matter how you set up this bucket (B2 or S3 compatible APIs). If you do not have a bucket yet, do the following:
- Log in to Backblaze
- click Buckets on the left under B2 Cloud Storage
- click on Create a Bucket.
- Give your bucket an unique name and set it to public
- Leave the other settings with their default values.
- Upload a test image to this bucket
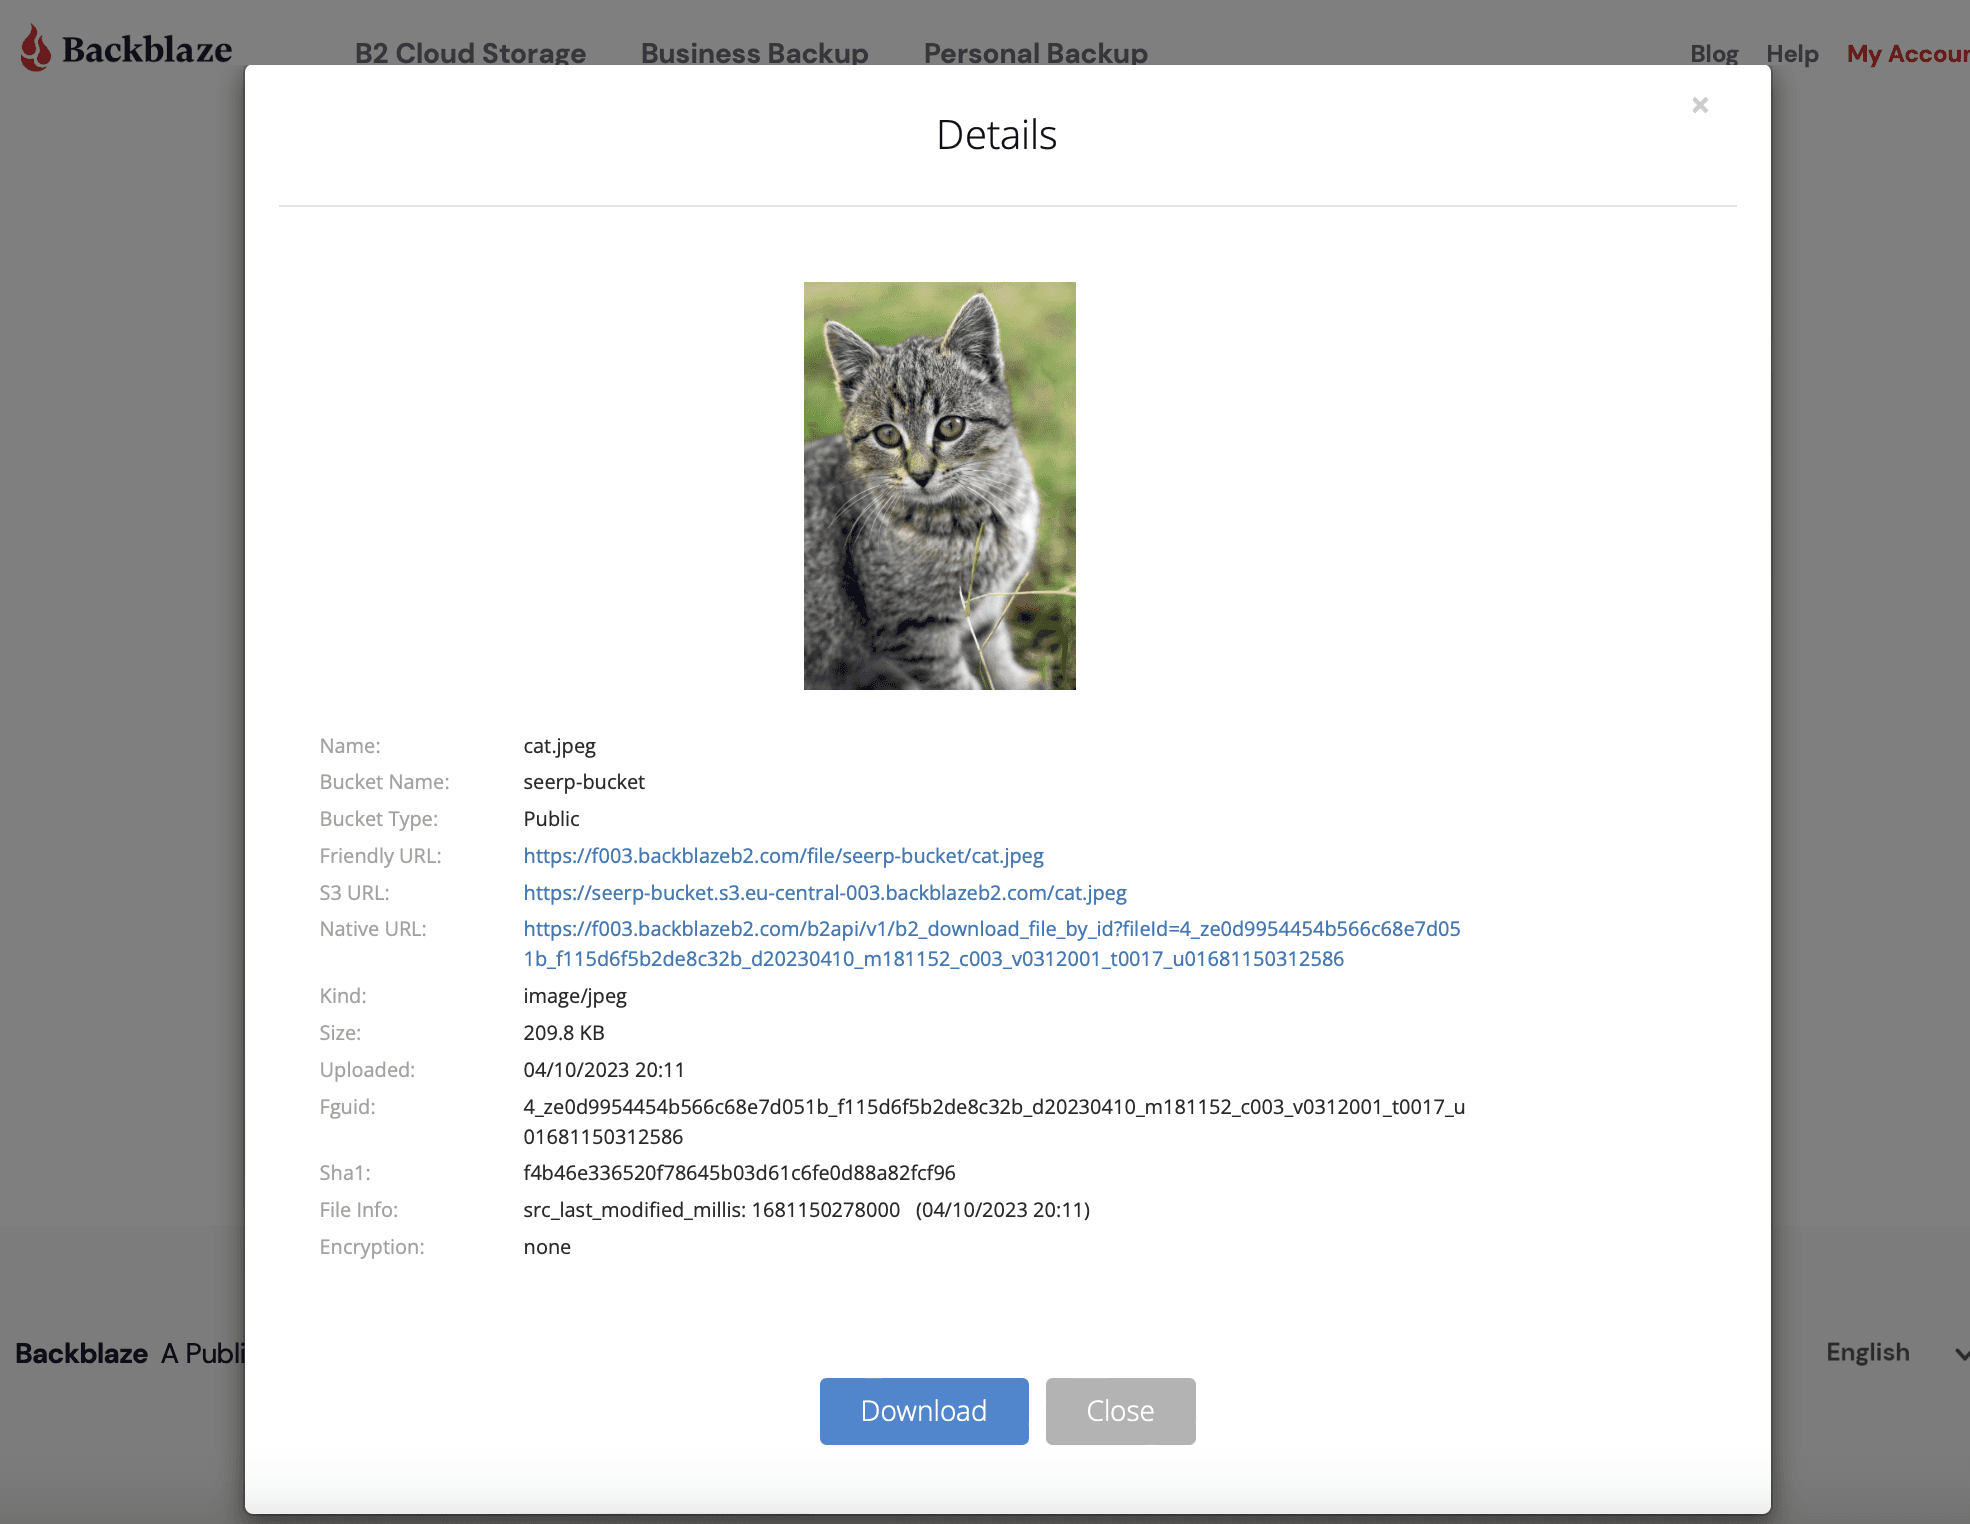
Note that our image is now available via: https://f003.backblazeb2.com/file/seerp-bucket/cat.jpeg. In the next step we will make sure that this file is available in the following way: https://files.example.com/cat.jpeg
In the next step we will need the domain and subdomain of our bucket. In this example it is f003.backblazeb2.com.
2. Point Subdomain to your bucket in Cloudflare
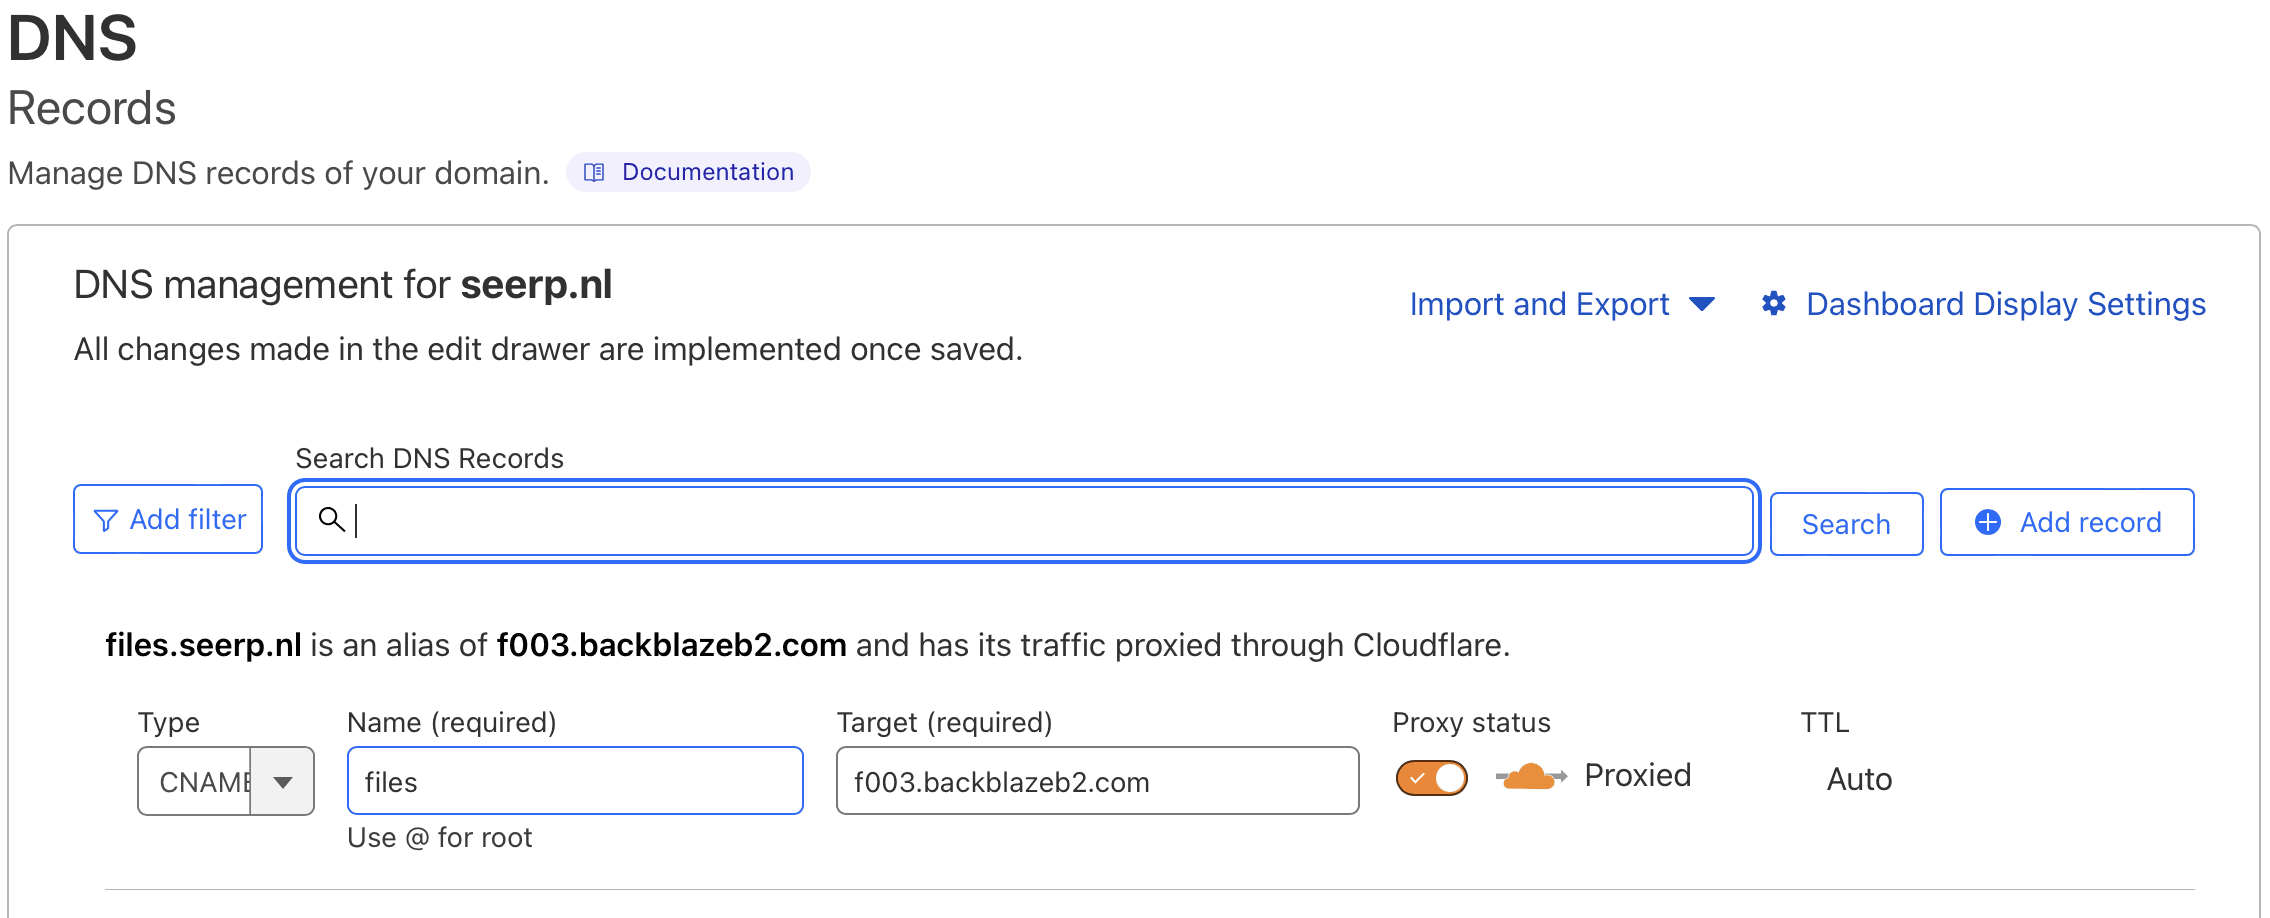
In order to point a subdomain to the bucket, you need to add a DNS CNAME record that points to the hostname you wrote down from your earlier bucket. Once this is done, it will show up in the Cloudflare dashboard.
Follow these steps:
- Navigate to Cloudflare and log in
- In Websites click on the domain you want to add subdomain to
- In the following page click on DNS in left sidebar
- Add the following record:
- Type: CNAME
- Name: files
- IPv4 address: bucket hostname (In this example it is
f003.backblazeb2.com)
If you now navigate to files.yourdomain.com/files/bucket-name/testimage.png you will most likely the following error page:
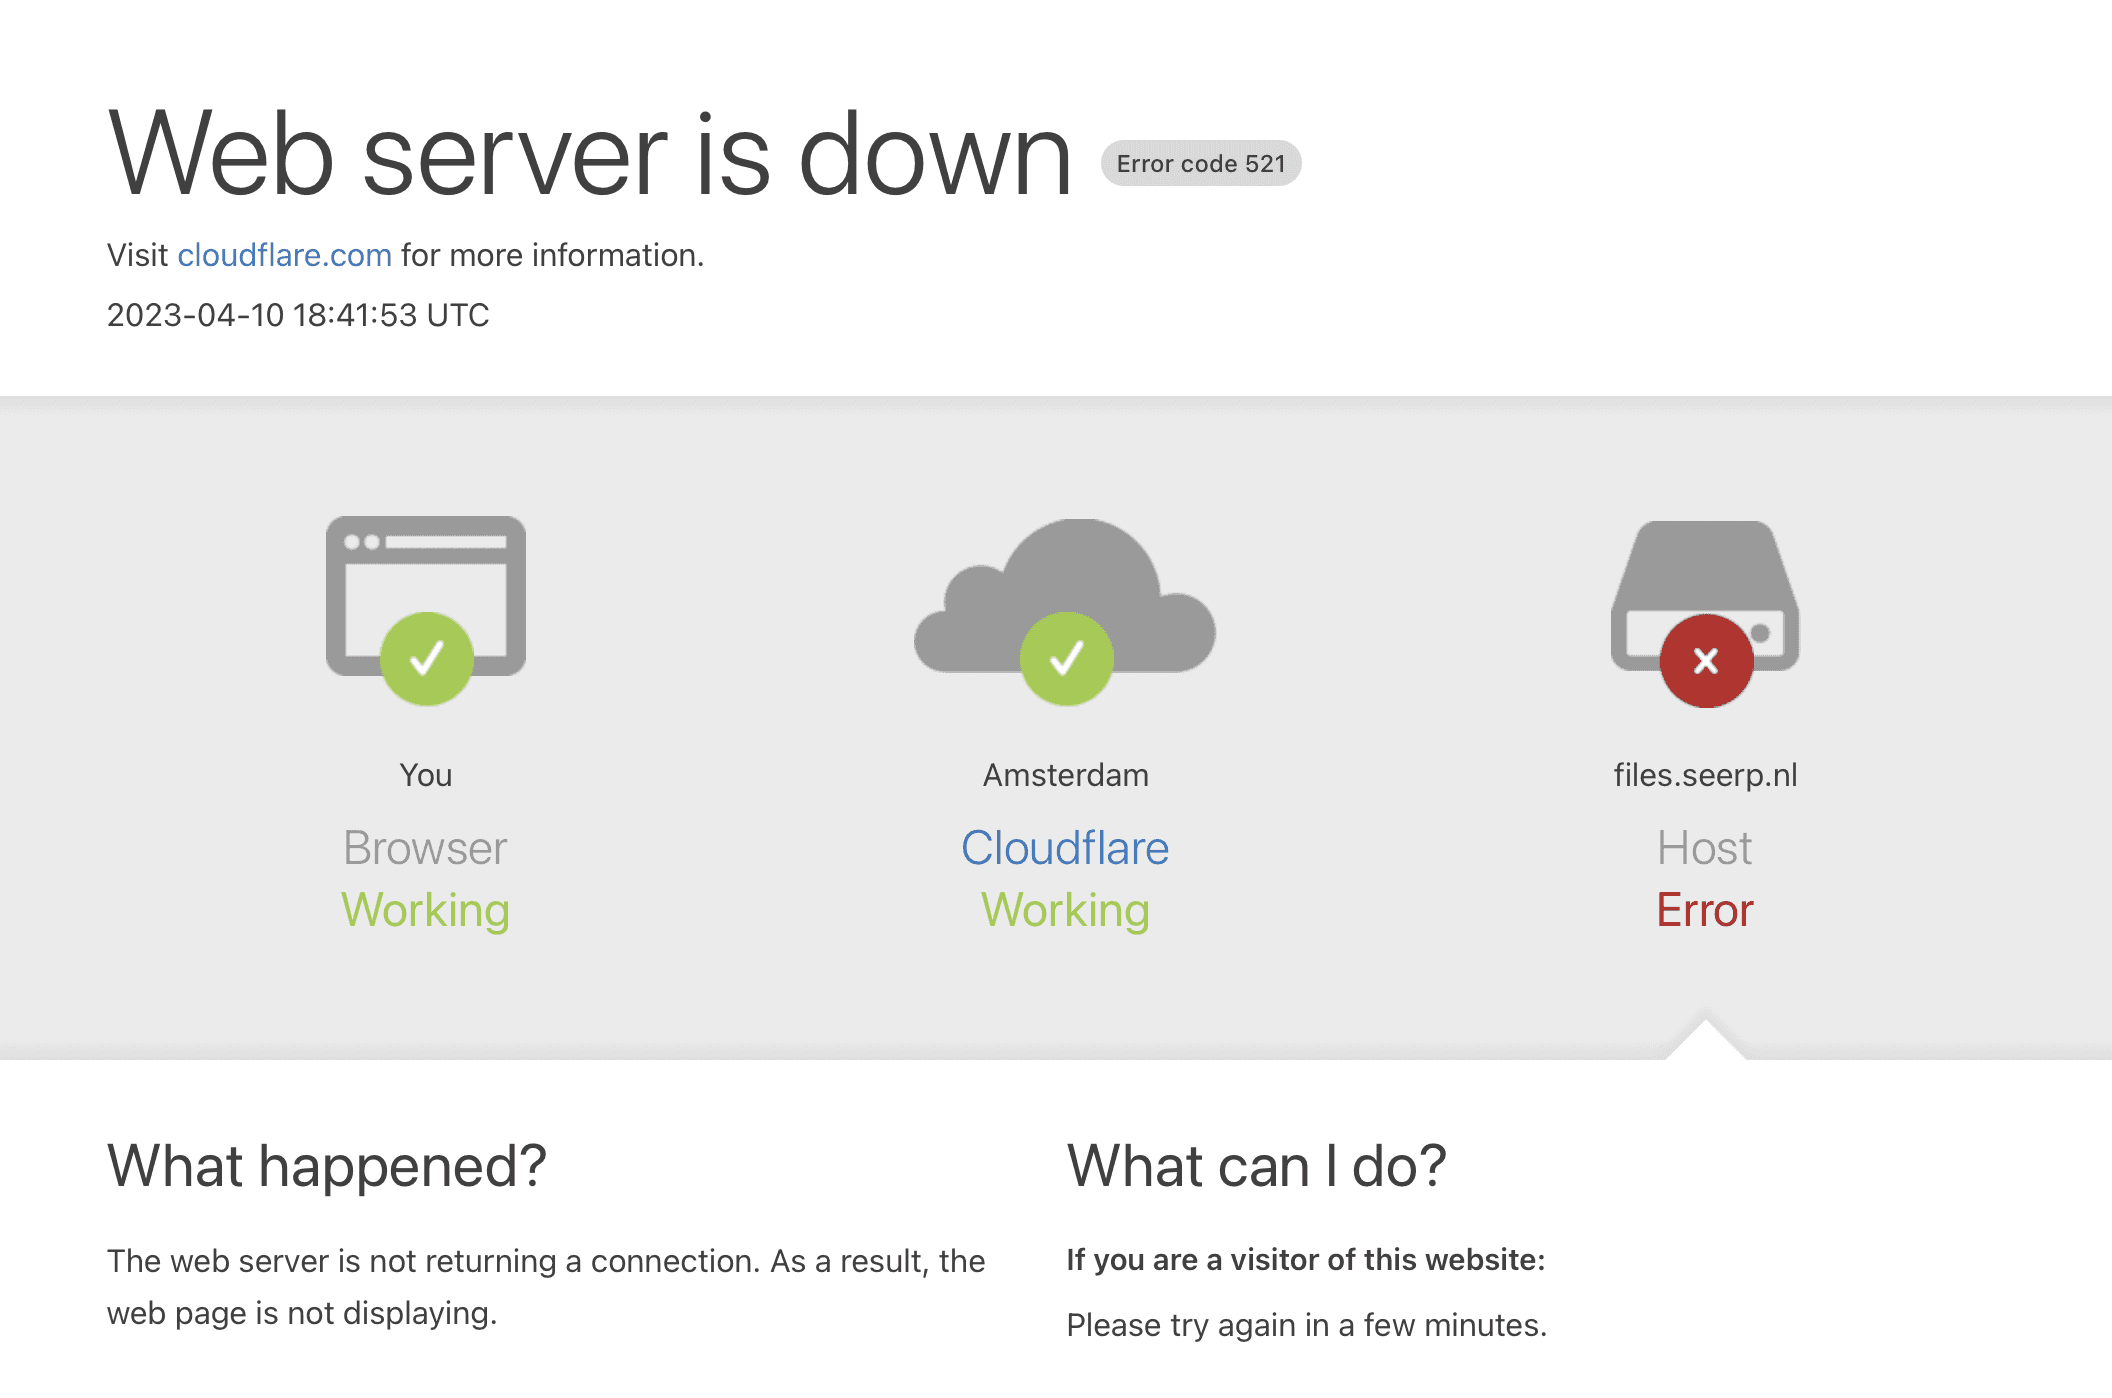
Don't panic, that is due to how Backblaze works. Backblaze only accepts HTTPS calls, and if you received this error it's due to how your Cloudflare is set up. Read more about 522 here To fix this do the following:
- Navigate to SSL/TLS in sidebar
- Change your SSL/TLS encryption mode from Flexible to Full(Strict)
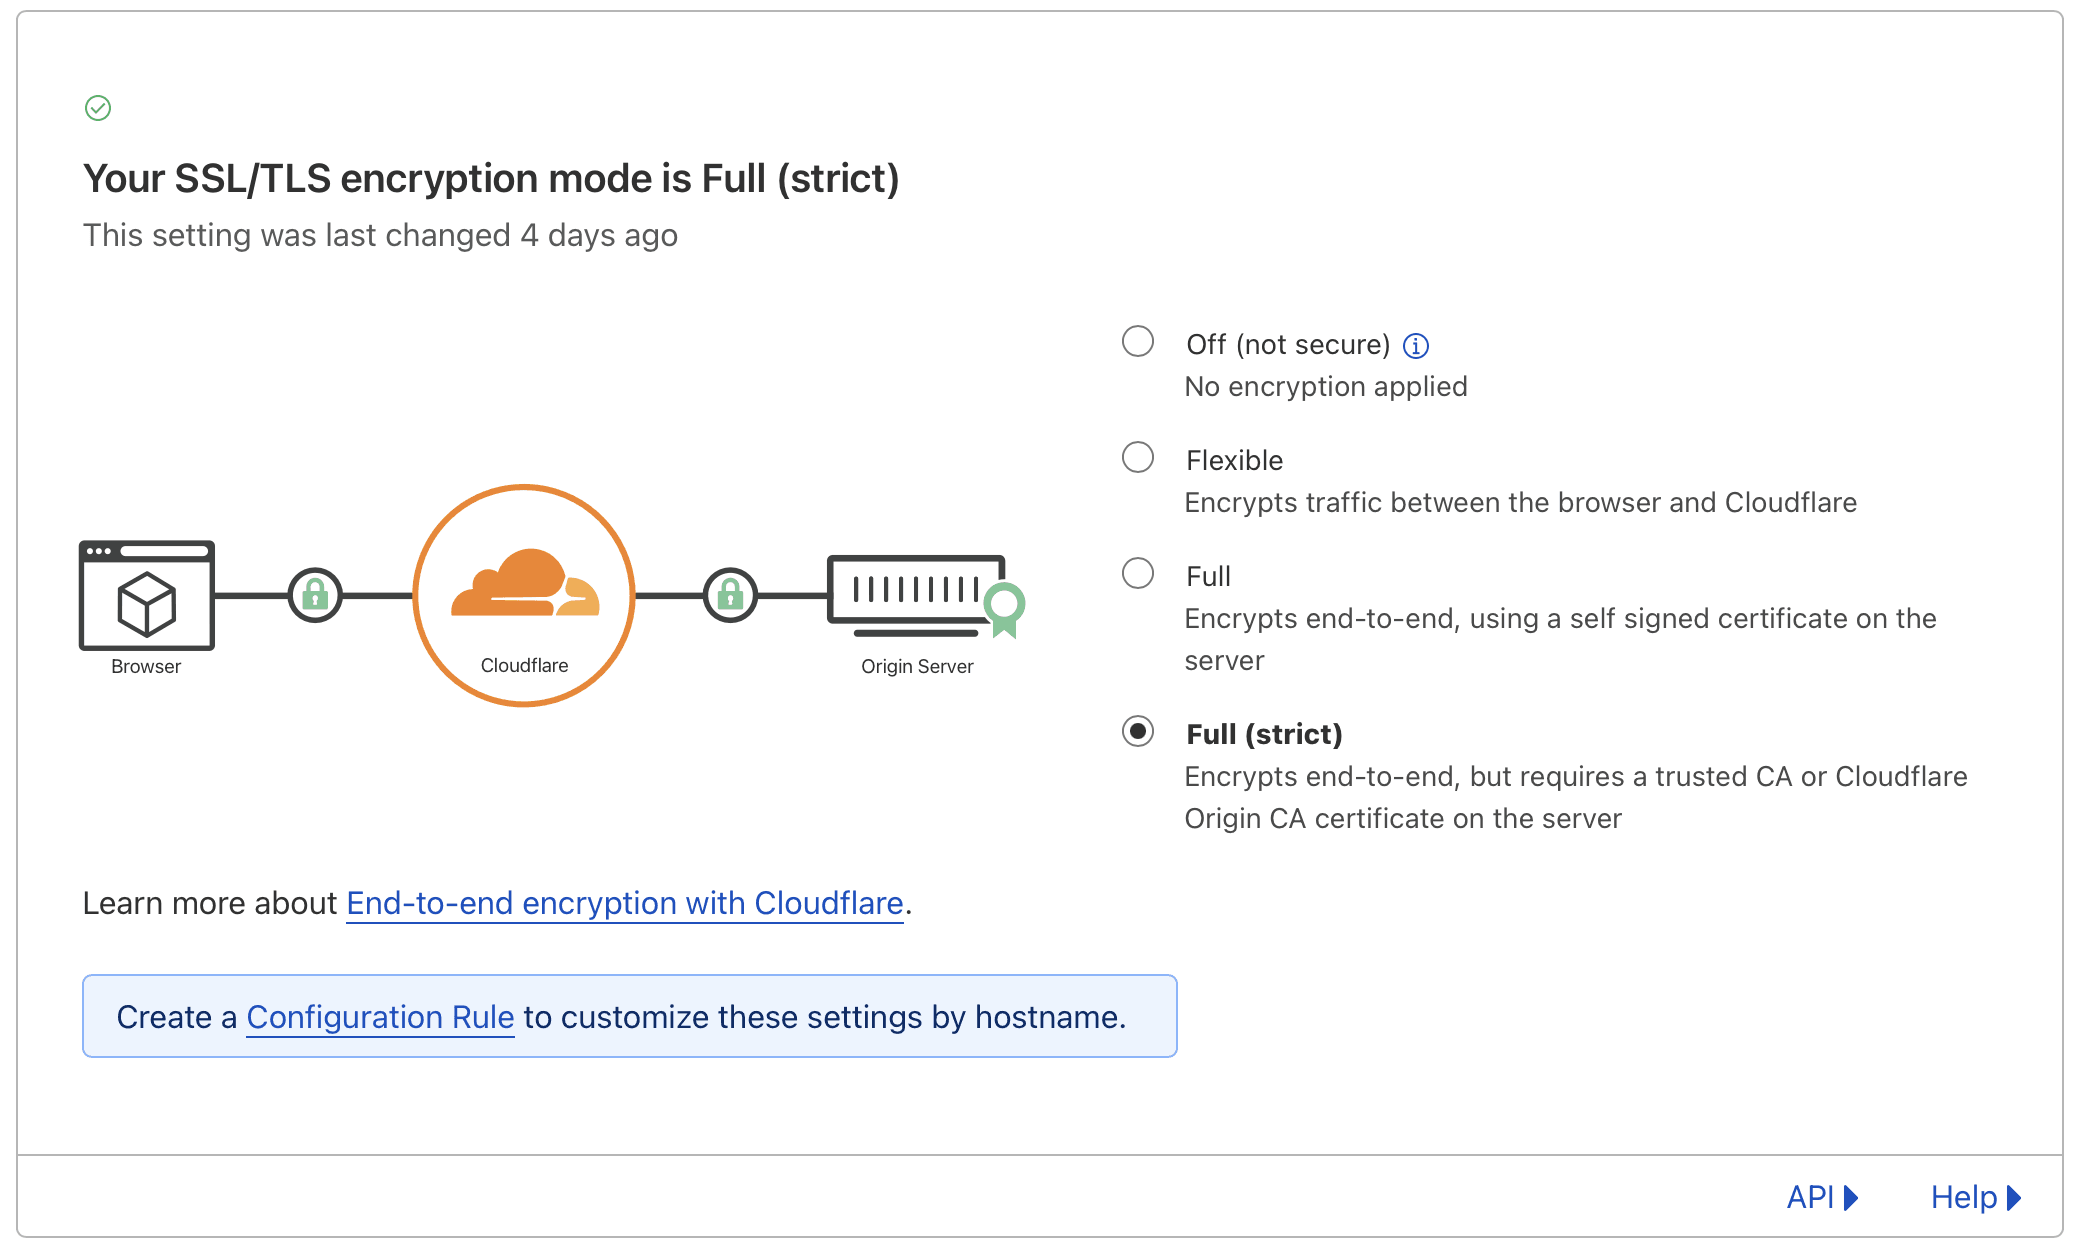
Now wait a few minutes and try again. If all is well you should now see your image
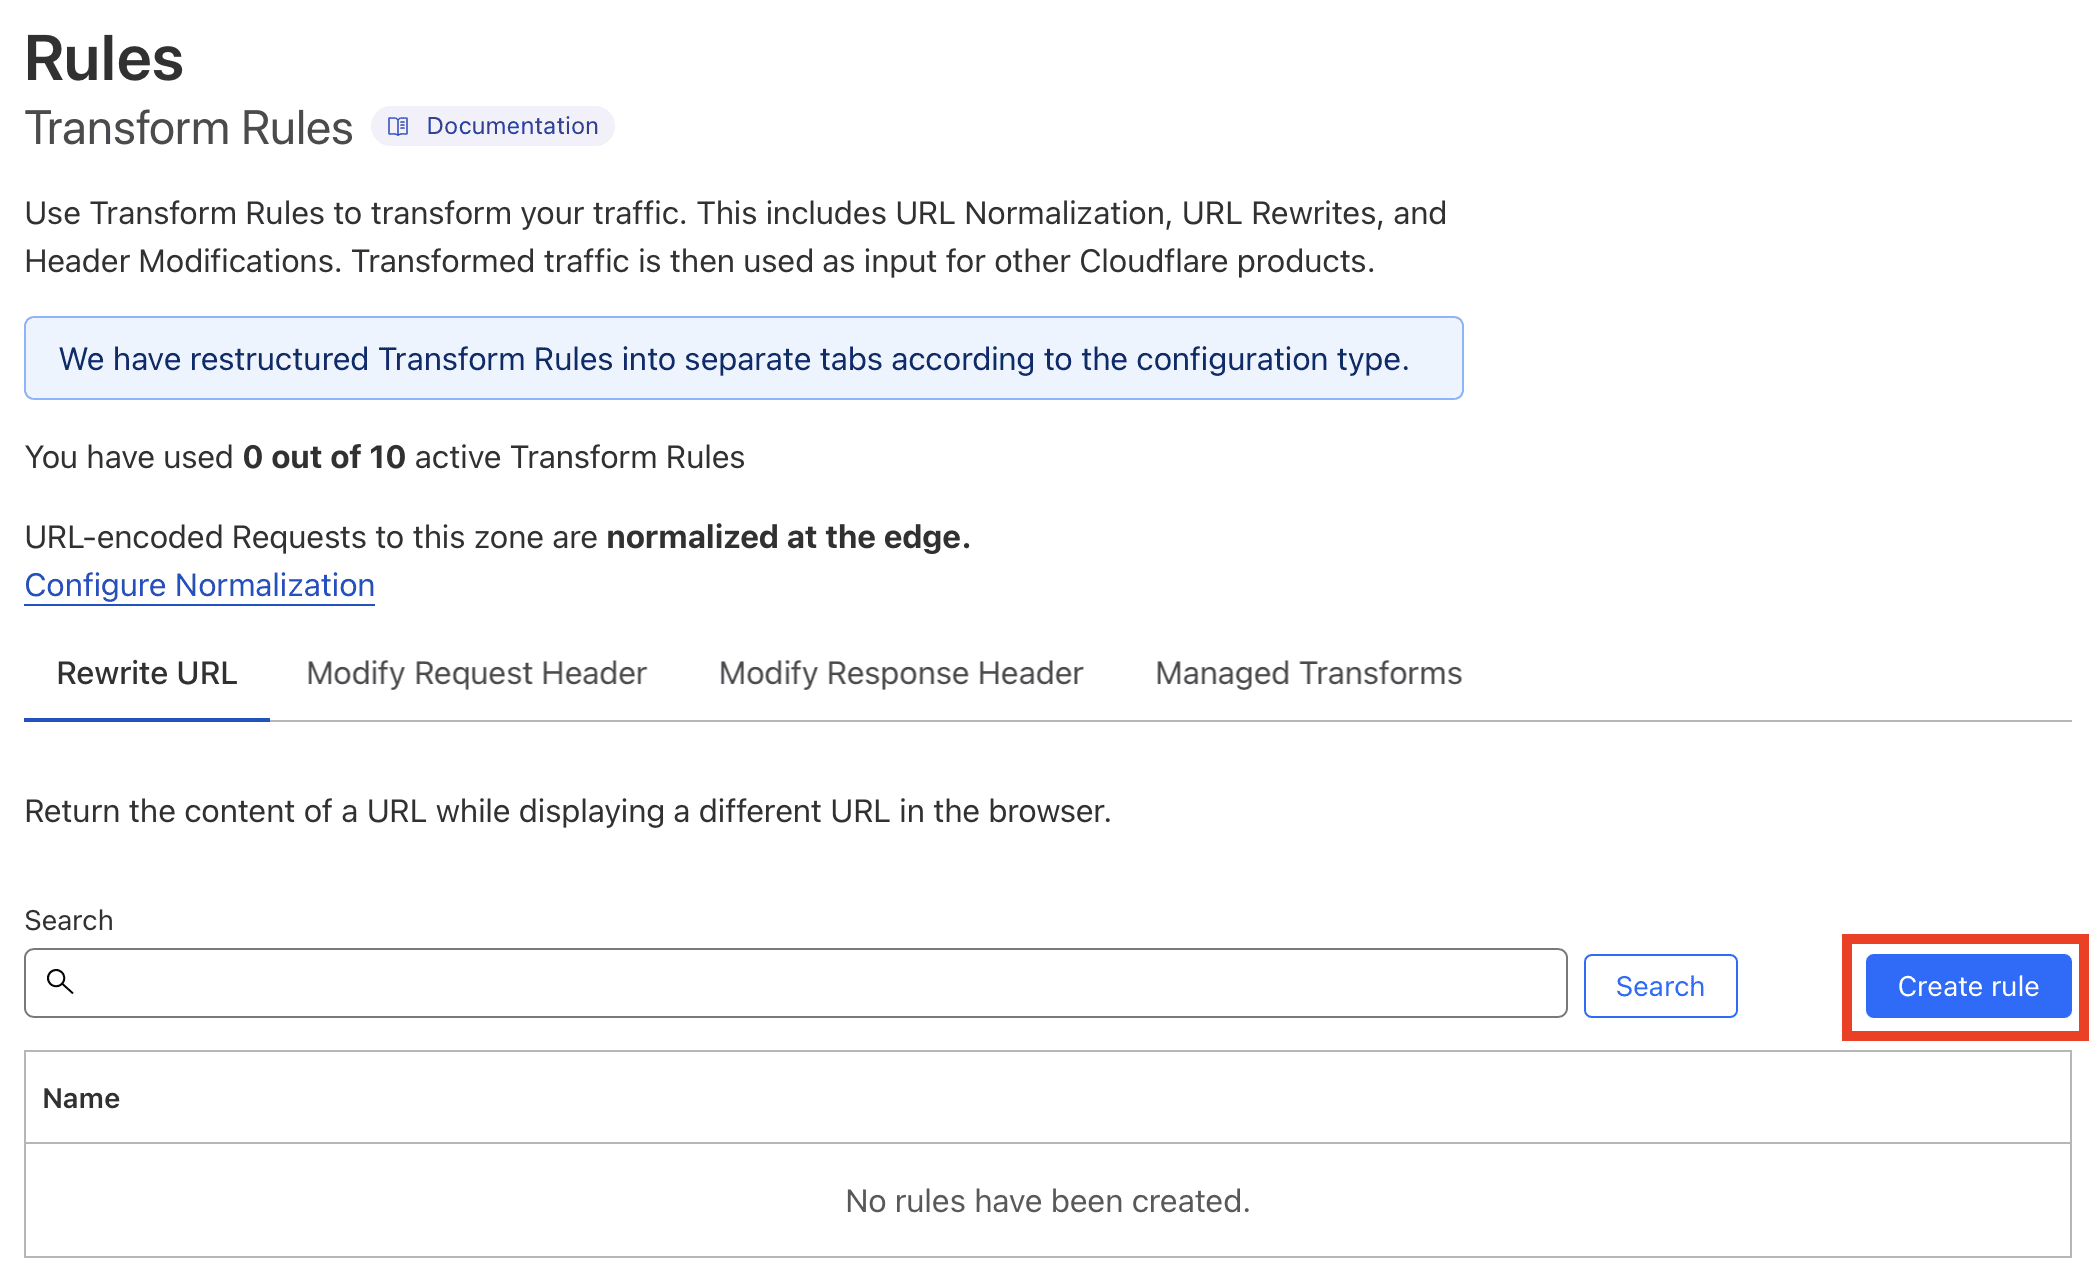
3. Create a transform rule
During this step we will the URL easier to read. Currently it's files.yourdomain.com/files/bucket-name/testimage.png, but we will make it as follows: files.yourdomain.com/testimage.png. This is possible as the /files/bucket-name/ part of the url will always be the same. We can achieve this by creating a transform rule in cloudflare. To set up a transform rule in Cloudflare navigate to the following page:
- Click on Rules in sidebar
- Click on Transform Rules
- Click on Create Rule in Rewrite URL tab
On the Create new Rewrite URL Rule page do the following.
- Give you Rule a descriptive name (e.g. backblaze rewrite rule)
- Click on Custom filter expression radio button
- Click on Edit Expression
- Fill in the following:
(http.host eq "files.[yourdomain].nl" and not starts_with(http.request.uri.path, "/file/[your-bucketname]"))
- In Then section click on Rewrite to...
- Select Dynamic in dropdown
- Fill in the following:
concat("/file/[your-bucketname]",http.request.uri)
- Click on Save
Now test by going to: `file.[yourdomain].com/testimage.jpg`` Congrats!
4. Set up headers (to improve caching)
We could leave it here, but it will take 5 more minutes to make sure the caching is set up properly. This will improve the speed images load (a second time)
In order to do this we will go back to the Transform rules page. From there follow these steps:
- Go to Modify Response Header tab
- Then click on Create rule
On the Create new HTTP Response Header Modification Rule page do the following.
- Give you Rule a descriptive name (e.g. Remove Backbaze B2 Headers)
- Click on All incoming requests radio button
- In the Then part create the following rules:
-
First header modification
- select item: Set Dynamic
- Header name: ETag
- Value:
concat(http.response.headers["x-bz-content-sha1"][0], http.response.headers["x-bz-info-src_last_modified_millis"][0], http.response.headers["x-bz-file-id"][0]) -
Further more you need to remove the following headers:
- x-bz-content-sha1
- x-bz-file-id
- x-bz-file-name
- x-bz-info-src_last_modified_millis
- x-bz-upload-timestamp
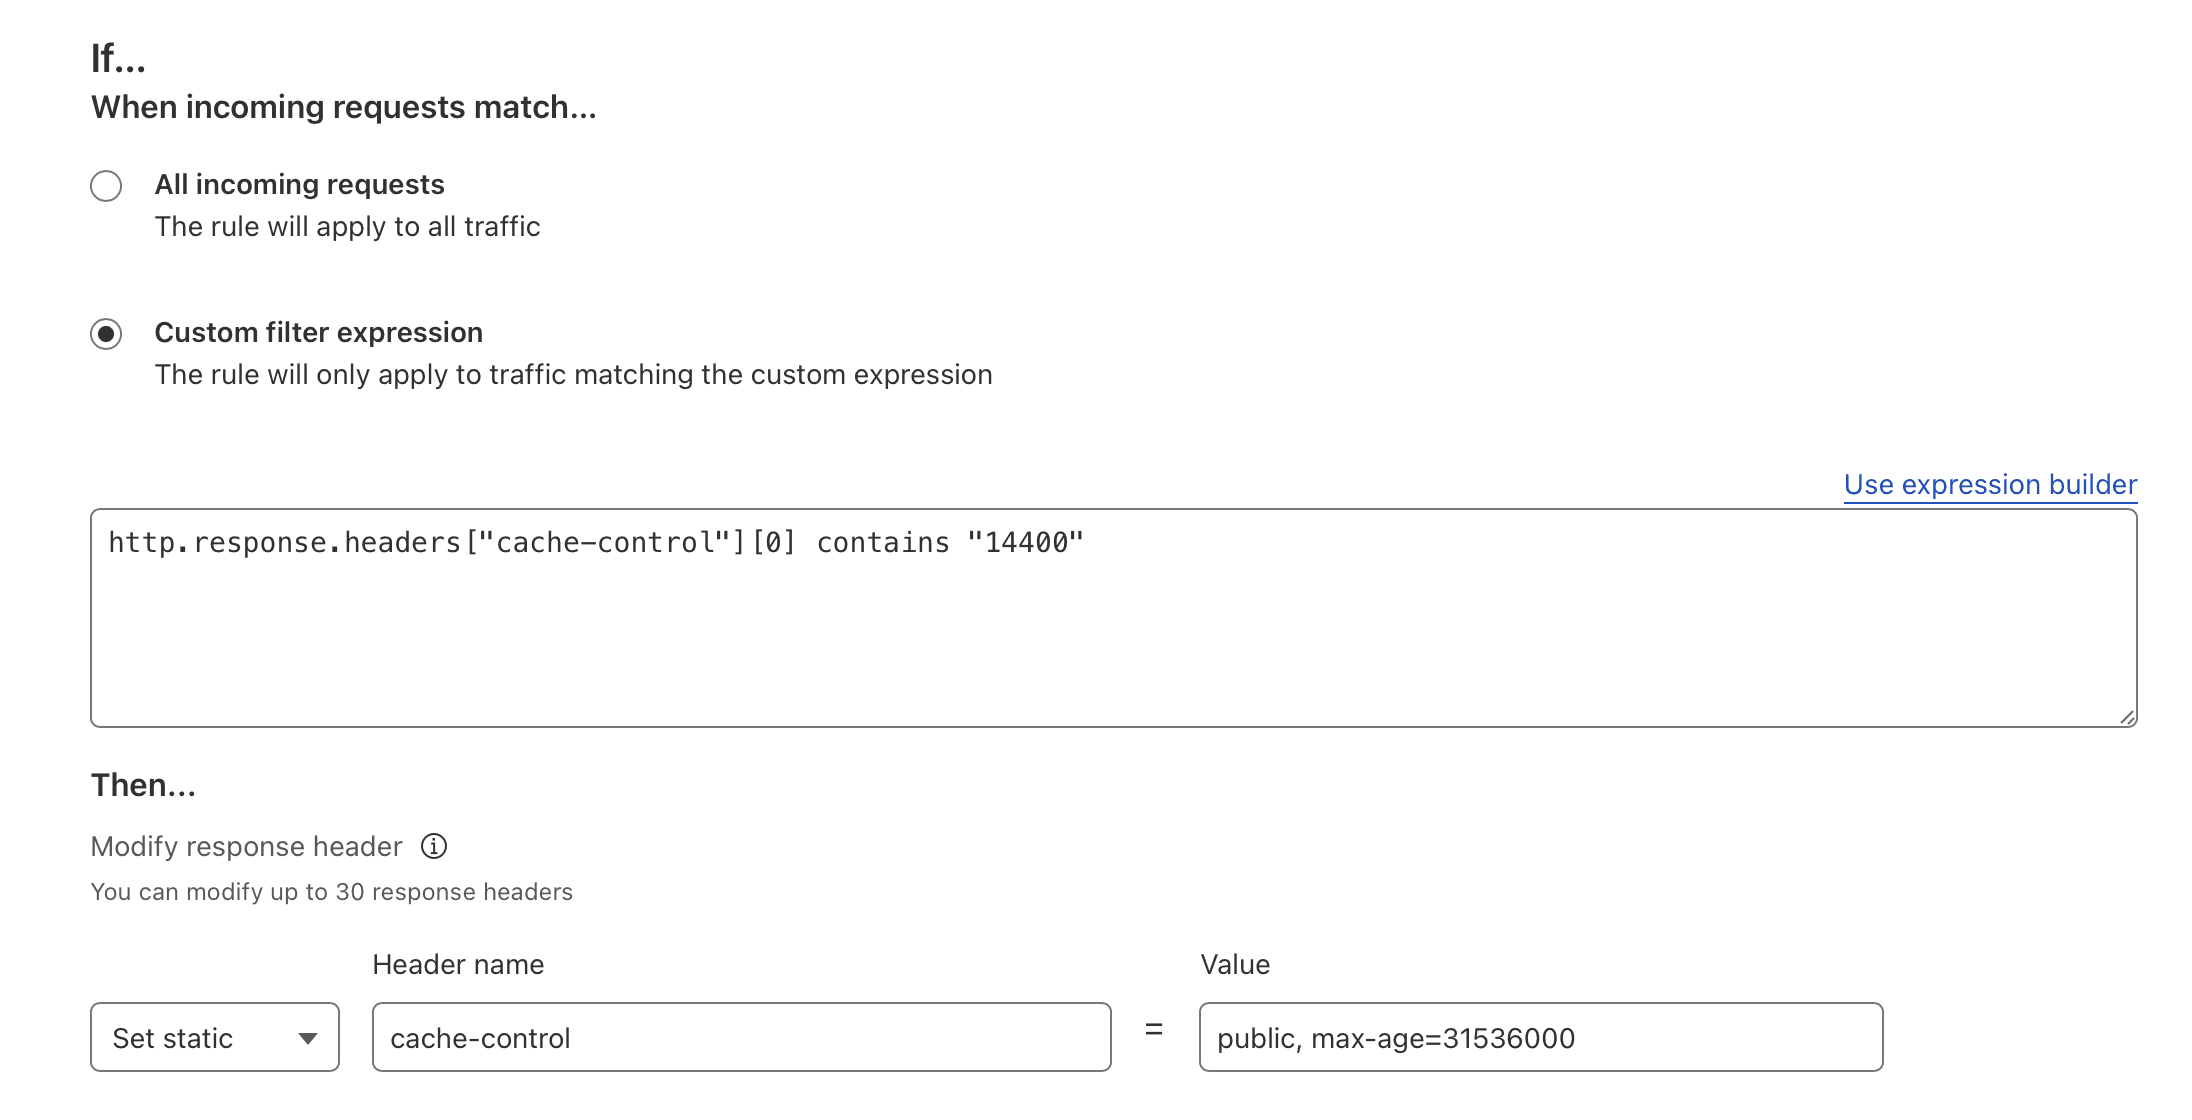
Finally we will make sure that our images are cached for a longer time. We can do this by creating another Response Header Modification Rule. So create a new one and set it up as follows:
- Give it a descriptive name (e.g. Increase browser cache header)
- Click on Custom filter expression radio button
- Fill in following expression:
http.response.headers["cache-control"][0] contains "14400"
- Then
- Set-Static
- cache-control
public, max-age=31536000